


Now that most of the mechanical and electronic upgrades on our OVR Toyota Land Cruiser 100 Series project vehicle have been installed, it was time to turn our attention to the truck’s lighting set up.

Having ample amounts of light projecting from your rig is essential to its safe operation and accurate navigation in low light and dark environments. We approached the auxiliary light setup on the OVR LC100 with two goals in mind. We wanted plenty of bright, usable light at a non-wallet busting budget.
After looking at the many available lighting options on the market, we decided on a modest setup that consists of just three pairs of lights. A set of Ironman 4x4’s Scope lights and two pairs of KC HiLiTES Flex ERA 1 lights.
It may seem like a minimal light setup when compared to the monster light assemblages you see on trucks rolling around town and on the trails, but our simple setup provides plenty of light for our needs. Let’s examine why we went with this simple set up in detail.
Comparison Images (swipe right): All lights on > only KC Flex ERA 1 ditch lights > only center mounted Ironman 4x4 Scope LED lights:


Forward Facing
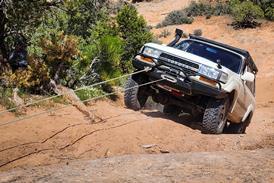
Mounted on the Land Cruiser’s Ironman 4x4 front bumper is a set of Ironman 4x4 9” Scope LED driving lights. These large 9-inch diameter LED lights are powerful, emitting as much as 32,000 raw lumens of light per pair.
Ironman 4x4’s Scope lights are available in 5”, 7” and 9” diameters. We went with the largest 9-inch version to match the old-school Australian tourer aesthetic that we are going for with the Land Cruiser.

The lights are available in a far-reaching spot light pattern and a multi-role combo pattern. We chose to go with the combo pattern because we wanted the benefits of having both good light throw while having a wider area lit up ahead of the truck than a dedicated spot light would provide.
Spot lights are designed for far reaching illumination, which is needed for vehicles that are moving at high speeds – think of a Baja 1000 desert racer blasting through the desert. Since the OVR LC100 will most likely never be driven nearly that fast on the trails at night, a powerful spot beam was not needed.


Instead, the combo beam pattern version of the Scope light we chose serves us well by lighting up a broad horizontal area in front of us while offering spot lenses that focus directly ahead. When it’s dark out, we’re driving slow, looking for rocks, unexpected dips and ditches and any other obstacles or obstructions on the trail.
The Scope lights come with built-in “side shooter” day time running lights and illuminated Ironman 4x4 logos, which make the lights look refined and rather upscale. Built for durability, these lights boast IP68 water and dust protection, heat dissipation, and virtually indestructible polycarbonate lenses. The robust DuPont powder-coated aluminum housing and stainless-steel mount system ensure long-lasting performance.


These lights offer plenty of performance and style and with a retail price of just under $700 for the pair with wiring harness and switch or $600 without, they offer a lot of value as well. We’re very happy with these lights and highly recommend them to those looking for powerful, stylish lights that don’t cost an arm and a leg.
We previously tried out an all-KC lighting solution that features KC’s 6” SlimLite LED lights and Flex ERA 1’s on the Land Cruiser that we are also happy with. You can read about that setup here.
Ditch Lights
Ditch lights help illuminate either side, forward of the vehicle. Like their name implies, they are there to light up the ditches, or edges of the trail. Needless to say, staying on the trail is important and being able to see the limits of a trail is a must.
Staying on the trail helps you reduce the likelihood of picking up tire or vehicle damage and in extreme cases, it can save your life. Let’s just say that it’s oftentimes near impossible to see the drop off on a mountainous trail in total darkness.


Ditch lights come in various sizes and power. In order to keep ourselves under our budget and also go for a stealthier look, we chose the smallest Flex ERA series lights that KC HiLITES makes, Flex ERA 1 (FE1). KC’s FE1 lights are cube shaped with each side measuring less than 3-inches. This makes them compact, but don’t let their size fool you; they are plenty bright for our purposes.

KC FE1 boasts a 2,340-lumen rating and comes with interchangeable beam pattern lenses, allowing them to be switched between spot, spread, and flood beams quickly. The lights also have changeable colored bezels, which add a customizable touch. We swapped out the gold bezels they come with for optional black bezels.
The FE1’s small size and unique design make them perfect for mounting in any tight space. In our case, we used a set of Ronin Metalworks Ditch Light Brackets to place the FE1’s low and forward of the Land Cruiser’s side view mirrors.

This positioning keeps them out of the driver’s view and may help with reducing possible wind noise too. Our view is unobstructed and we don’t hear any wind noise from the ditch lights so we think this mounting position is perfect.
KC offers a wide selection of more powerful lights that can be used as ditch lights, if that’s what you’re looking for. For our use, we think the lower-powered FE1’s are just right. The bright LED lights easily light up the darkened areas to the sides of our front fenders nicely.

FE1’s also have an amber LED backlight feature that is unique to certain KC lights. When activated, the backlight lights up to reveal an amber ring light. They’re mostly there for style but we found them useful for casting a soft light at the campsite and for navigation around the truck that won’t blind night-adapted vision. It’s a nice touch that we like a lot.

A KC Flex ERA 1 master light kit, which includes a pair of FE1 lights, a wiring harness and power switch is just $340. For the capability it provides us, we think it’s a great deal. In fact, we like them so much we got another pair to act as the Land Cruiser’s rear facing chase lights.
Chase Lights
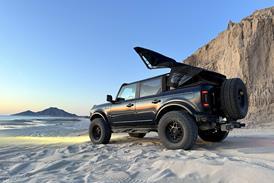
High mounted chase lights signal your vehicle’s position to those behind you, especially in areas where vertical visibility is obstructed, such as by tall sand dunes. Chase lights are also beneficial in conditions where dust, thick fog, or falling snow can obscure visibility.
We chose the FE1s to use as our ditch lights for many of the same reasons we went with them for our ditch lights. They are powerful enough for our purposes, are compact and fit within our budget. They also act as useful area lights as well, allowing us to work out of the back of the truck and the surrounding area.


We mounted the rear facing Flex ERA 1’s on the Land Cruiser’s Front Runner roof rack. Using Front Runner spot light brackets, we were able to get the lights situated perfectly for the task. Being that the chase lights are rear-facing, we opted for KC’s optional amber colored protective lenses to install onto them. KC also offers opaque and clear protective covers as well.


Additional Lighting
This simple setup provides more than enough light for the trips that we’ve taken the Land Cruiser on. You may have noticed that we opted not to install forward facing roof rack mounted lights. Since the front bumper mounted lights provide plenty of light already, we haven’t found the need for it yet. Perhaps we’ll add them if the need every arises but we’re good without them for now.
What we may choose to add are rock lights, which are small lights that are mounted within a vehicle’s wheel wells. Lights positioned that low help illuminate any obstacles underneath the truck and are nice area lights for work or the campsite.
A Word About Installation
These Ironman 4x4 an KC lights come as DIY install kits that are availalbe with all required installation materials such as wiring and power switches. If you don’t mind putting in some elbow grease yourself, these kits can be installed without profesional help. But if you’re not into fiddling with wires, you can do as we did and call up a professional. In our case, we called electronics expert, Al Catolos of Sponsored by Wifey (SBW), to install our lights.
Final Thoughts
With the addition of just three pairs of auxiliary lights, we have all of our basic off-road lighting needs covered from front to back. This efficient, budget-minded lighting configuration improves lighting all around the Land Cruiser and offers safe navigation when off-roading at night as well as providing ample area lighting when on the trail or at the campsite.
Ironman 4x4 9” Scope LED Driving Lights with Wiring Harness
KC Flex ERA 1 Master Light Kit
Read More About the OVR LC100 Budget Build by Clicking Here!
For more informative articles like this, consider subscribing to OVR Magazine in print or digital versions here. You can also find the print edition of OVR at your local newsstand by using our Magazine Finder


No comments yet